Clean girdling, moist sphagnum wrap, firm seal, stable humidity, and patient aftercare.
You want strong roots, fast, and with minimal risk of scarring. You also want a repeatable method you can trust on maples, ficus, junipers, and pines. I have been there. A branch has perfect taper and movement. But there is no nebari and the trunk is stuck in bad soil. The Best Marcotting Procedures For Bonsai fix that. They let you reset roots at the exact height you need. They also help you clone top-tier branches from a mother tree. In this review, I show the tools and steps that make air-layering clean, safe, and reliable.
PEEORNT 22-Piece Bonsai Tools Kit
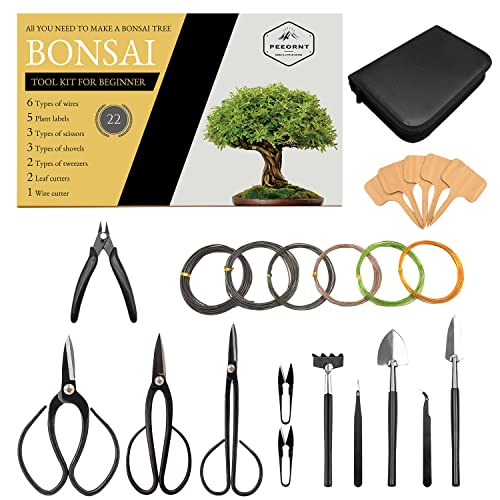
This all-in-one kit gives you most of what you need for air-layering. The pruning shears make clean cuts. The cutters open girdles with control. The training wires hold wrapped moss in place. I like it for beginners. You can unpack it and start a marcot the same day.
The steel feels solid for the price. The scissors are sharp out of the box. The wire set is enough for several layers. I also like the multi-size tools. It helps when you work on big ficus and small maple twigs on the same day.
Pros:
- Full starter kit for air-layering and basic bonsai care
- Sharp shears for precise girdling cuts
- Good assortment of training wires for moss wraps
- Value pricing for 22 pieces
- Works for repotting, pruning, and post-layer care
- Handy storage keeps tools organized
- Useful for both indoor and outdoor trees
Cons:
- Not pro-grade steel on every tool
- Wire cutters could be stronger for thick copper
- Some tools may need touch-up sharpening over time
My Recommendation
This kit suits new bonsai fans who want to try air-layering now. It also suits casual growers who need a compact set that covers many tasks. The highlights for marcotting are the snips, wire, and cutters. They help you follow the Best Marcotting Procedures For Bonsai with less fuss. You can upgrade single tools later as you learn.
| Best for | Why |
| Beginners | All key tools in one kit for first layers |
| Budget buyers | Strong value with 22 useful pieces |
| Small spaces | Compact storage and easy tool access |
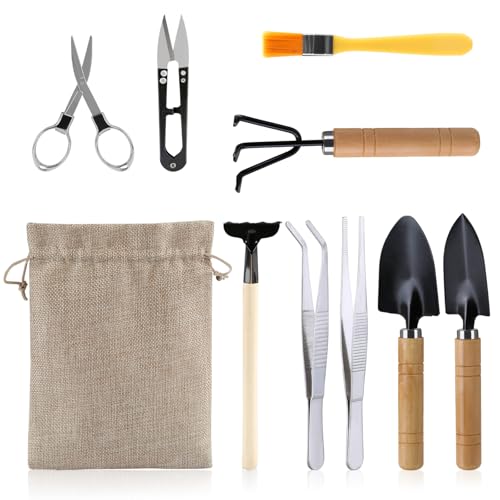
20-Piece Bonsai & Succulent Tool Kit

This set packs smart extras for air-layering work. The 262 feet of wire gives you long-term supply for moss wraps and tie-downs. The repotting mat is a secret hero. It keeps your sphagnum, perlite, and tools clean and dry while you prep your layer. The leather bag holds it all for fast grab-and-go.
The scissors and shears handle fine cuts well. I also like the small tools for cleaning cambium and removing bark rings. The mat helps in small apartments or balconies. It reduces mess when you wet moss, apply hormone, and bag the layer.
Pros:
- Large wire supply for many marcots
- Repotting mat keeps a clean workspace
- Good scissor control for bark ring prep
- Portable leather bag for travel or classes
- Useful for succulents and bonsai alike
- Helps stage all parts of the air-layer
Cons:
- Wire is lighter; not for very thick branches
- Some tools feel lighter duty than pro lines
- Bag material is not rigid; pack with care
My Recommendation
This kit fits growers who value a clean, mobile setup. It is great if you do layers on balconies, in rentals, or at club meets. The wire and mat speed up neat work. They help you apply the Best Marcotting Procedures For Bonsai without chaos. It also supports aftercare and repot tasks once roots form.
| Best for | Why |
| Apartment growers | Repotting mat and tidy layout reduce mess |
| Frequent layers | Long wire roll for many projects |
| Club learners | Grab-and-go bag for classes or demos |
Fiskars Micro-Tip Pruning Snips 6-inch

These snips shine in tight spaces. I use them to start and clean up the girdle ring. The micro-tips help you cut bark without tearing the cambium beyond the ring. They are also great for removing small shoots inside the moss wrap area.
The blades are sharp and stay sharp with light care. The sheath is handy for pocket carry during long sessions. The grip reduces hand strain when you prep several layers at once. They also excel in post-layer cleanup when you trim new feeder roots with care.
Pros:
- Precision tips for clean bark removal
- Sharp blades with good edge life
- Comfort grip for longer sessions
- Sheath for safe carry
- Great for delicate root and shoot trimming
- Trusted brand with consistent quality
Cons:
- Not meant for thick wood
- Needs cleaning after sap-heavy species
My Recommendation
If you value clean, exact cuts, get these. They help you avoid ragged cambium, which slows rooting. These snips support the Best Marcotting Procedures For Bonsai at the most sensitive step. I reach for them on maples, azalea, and other thin-bark species where a steady hand matters.
| Best for | Why |
| Precision prep | Micro-tips limit damage to cambium |
| Fine pruning | Clean up shoots inside the wrap zone |
| Post-layer care | Trim tender roots without crushing |
Kiyonal Bonsai Pruning Sealer 100g

Air-layer success rides on moisture and hygiene. A good sealer helps a lot. Kiyonal is a well-known Japanese pruning sealer. I apply a thin coat to exposed cuts above the girdle line. It reduces sap bleed and keeps pathogens out. It does not interfere with rooting below the ring.
I also use it after I separate the layer. It seals the cut face on the mother trunk. That helps the parent tree recover faster. The texture spreads well and sets clean. For me, it is a staple in my air-layer kit.
Pros:
- Reliable seal on fresh cuts
- Easy to apply thin and neat
- Supports tree health post-separation
- Works on many species
- Trusted by bonsai hobbyists and pros
Cons:
- Small tube; consider two for many projects
- Price per gram is higher than some pastes
My Recommendation
Use this if you want fewer infections and cleaner healing. It is ideal for maples, elms, and junipers. It also helps on thick ficus cuts. For the Best Marcotting Procedures For Bonsai, a clean seal is insurance. I keep a tube on hand for every layer cycle.
| Best for | Why |
| Cut hygiene | Reduces pathogen entry on wounds |
| Post-layer heal | Mother tree closes faster |
| Thin-bark trees | Limits sap loss and stress |
9-Piece Basic Bonsai Tools Set
This simple set covers light-duty layers and post-root care. You get shears, fold scissors, a mini rake, and small hand tools. They are enough to remove bark, clean the cambium, and shape moss. The price is friendly if you only do one or two layers per year.
I like the fold scissors for tight spaces and small twigs. The mini rake is handy to loosen topsoil when you set the final root crown. This set is not heavy-duty. But for small projects, it gets the job done.
Pros:
- Budget-friendly entry to bonsai tools
- Small tools fit tight work zones
- Light and easy to carry
- Good for small species and pre-bonsai
- Handy for post-layer root combing
Cons:
- Not suited for thick wood or heavy wire
- Steel and fit are basic
- Fewer pieces than full kits
My Recommendation
Pick this if you are on a tight budget or have only one bonsai. It is also fine for kids or class demos. It supports the Best Marcotting Procedures For Bonsai on small branches. Later, add a sharper snip or stronger cutter if you scale up.
| Best for | Why |
| First tools | Low cost and easy to learn |
| Small projects | Tools fit fine work |
| Teaching | Safe starter set for learners |
What Is Marcotting (Air-Layering) and Why It Works
Marcotting is air-layering. You force a branch to grow roots while it is still on the tree. You do this by removing a ring of bark. You keep the ring area moist with sphagnum moss. You seal it with plastic or a pod. The branch grows roots into the moss. Later, you cut below the new roots and pot the new tree.
This works because you stop the flow of sugars down the phloem. The top keeps making energy. The plant sends new roots to fix the break. The moss holds water and air. It stays sterile and springy. That is why moss is best for many species.
The Best Marcotting Procedures For Bonsai use clean cuts, ideal moisture, and steady warmth. They also use the right hormone at the right time. These steps push the odds in your favor. You get more roots, faster, with less risk.
Step-by-Step: Best Marcotting Procedures For Bonsai
Pick the right branch. Choose one-year to three-year wood for most trees. Aim for pencil to thumb thickness. Check for healthy leaves and no pests. The branch should have good taper and movement.
Time it right. Late spring to early summer works best for most. The sap is rising. Growth is strong. In warm climates, you can layer longer. In cool zones, start once nights stay above 50°F (10°C).
Prepare tools and materials. You need clean snips, a sharp knife, sphagnum moss, plastic wrap, wire or ties, and rooting hormone. Wear gloves. Clean blades with alcohol. The Best Marcotting Procedures For Bonsai depend on hygiene.
Make the girdle. Remove a ring of bark 1 to 2 times the branch diameter in width. Scrape off all green cambium until you see white wood. This step is key. Any cambium bridge can fail the layer.
Apply hormone. Use an auxin like IBA in gel or powder. 0.3% to 0.8% IBA works well for many species. Follow label directions. Dust or paint it onto the top edge of the ring.
Wrap with pre-wet sphagnum. Soak, then squeeze out excess water. It should be moist, not dripping. Pack it around the ring in a firm oval. Ensure full contact with the top edge.
Seal it. Use clear plastic, a layering pod, or black plastic if in strong sun. Tie the top and bottom tight with wire or zip ties. Leave no gaps. Add a small window if you want to check roots. I often double-wrap and then foil over if sun is harsh.
Label and support. Add a date tag. If the branch is heavy, prop or tie it. Movement can tear young roots. Support reduces risk.
Aftercare during rooting. Keep the moss moist. In dry heat, mist the wrap or inject water with a syringe. Do not let it dry out. Do not waterlog either. Aim for a cool, damp sponge feel.
Check for roots. In 4 to 12 weeks, many species show white roots. Ficus can be faster in heat. Pines can take months. Wait until many roots circle the moss. Thick, tan roots mean strength.
Separate and pot. Cut below the root mass with a clean saw. Pot in a free-draining mix. I like 60% pumice, 20% akadama, 20% bark or lava for new layers. Tie the tree to the pot for stability.
Post-separation care. Keep it in bright shade. Protect from wind and hard sun for 2 to 4 weeks. Water to keep even moisture. Feed very light at first. Then ramp up as growth resumes.
Species Timing and Tips
Ficus: Very forgiving. Warmth speeds roots. You can layer most of the year indoors or in tropics. Use clear wrap to watch roots.
Trident and Japanese maple: Late spring is prime. Be gentle with bark. Use sharp snips like the Fiskars. Avoid hot, dry winds. Shade the wrap.
Chinese elm: Fast rooter. Standard moss and wrap work. Check in 5 to 8 weeks.
Juniper: Slower. Use hormone. Keep moss moist, not wet. Provide dappled light. Expect 8 to 16 weeks or more.
Pine: Advanced. Use larger ring width. Use fresh, sterile moss. Keep patience. Expect months. Use strong support to avoid wobble.
Azalea: Thin bark, delicate. Use very sharp tools. Do not crush tissue. Keep high humidity in the wrap.
The Best Marcotting Procedures For Bonsai adjust to species. Time, ring width, hormone strength, and wrap type can change. Always record what you tried. Improve each season.
Tools and Materials You Actually Need
Sharp snips or a grafting knife. Clean, high-carbon steel holds an edge. A micro-tip snip helps with thin bark work.
Sphagnum moss. Use long-fiber. Rinse to remove dust. Soak and squeeze to the right moisture.
Rooting hormone. IBA gel or powder helps. Use clean brushes or cotton swabs. Close the jar fast to protect strength.
Wraps and ties. Clear plastic lets you see roots. Black plastic protects in hot sun. Use foil over clear in harsh light. Wire, tape, or zip ties hold the seal.
Sealer for other cuts. Kiyonal or similar helps the mother plant heal after you remove the new layer. It also helps on any accidental nicks above the ring.
The Best Marcotting Procedures For Bonsai also use labels and logs. A simple tag prevents guesswork. A log tracks timing and success rates.
Moisture, Temperature, and Light: The Winning Combo
Moisture is life. Moss should stay damp. Not soaked. Not dry. Squeeze it. It should feel like a wrung-out sponge. If it drips, it is too wet. If it crackles, it is too dry.
Temperature matters. Roots form best at 68 to 80°F (20 to 27°C). Too cold slows it. Too hot cooks it. Shade or foil helps in heat waves.
Light is a balance. The top needs sun to drive sugars. The wrap area does not need direct sun. Dappled light works best. Avoid baking the wrap in noon sun.
The Best Marcotting Procedures For Bonsai keep this balance. Moist moss. Warm air. Soft light. That is the trio I aim for.
Common Mistakes and How to Fix Them
Leaving cambium bridges. If roots never form, you likely left a green strip. Re-open the ring. Scrape to white wood. Re-wrap with fresh moss.
Moss too wet. Roots rot. Open the top tie and squeeze out water. Re-seal. Add a few air holes on the side if needed.
Wrap leaks. Dry moss stalls roots. Tighten ties. Add tape. Double-wrap. In dry climates, add a small syringe port to re-wet.
Cutting too soon. Wait for many roots. The moss should be filled. If only a few are visible, give it more time. Patience saves trees.
Sun scorch. If roots brown fast, shade more. Use foil or shade cloth. Move the plant to morning sun only.
The Best Marcotting Procedures For Bonsai are simple. But details matter. Fix small issues fast to save the layer.
After Separation: Root Management and Potting
Do not comb roots hard on day one. Keep the moss block intact if roots are thin. Set it in a well-drained mix. Tie down the tree tight. No wobble.
Water with a gentle stream. Let water run through the pot. Keep the soil moist but airy. Avoid heavy fertilizer for two to four weeks.
Light should be bright but indirect. Protect from wind. A simple humidity tent can help in dry homes. Vent it daily.
After four to six weeks, you can begin light feed. Use a mild organic or a low-dose liquid. Watch new growth. If it pushes, you are on track.
The Best Marcotting Procedures For Bonsai do not stop at the cut. Good aftercare locks in your win.
Advanced Tweaks That Raise Success
Tourniquet method. For some species, a wire ring can replace a full bark ring. It is slower but useful on hard-to-ring wood. It swells above the wire and roots form. Use care. Do not cut too deep.
Perlite blend. For very wet zones, blend perlite into moss. It adds air space. It cuts rot risk. It also reduces weight on long branches.
Biostimulants. Seaweed extract at low dose can support root growth post-separation. Do not add inside the wrap. Use later in the pot.
Heat wrap. In cold zones, a dark outer wrap warms the moss. You can also use a small heat pad near the pot after separation. Keep it safe and low.
Cleanliness. Sanitize tools often. Sap feeds fungi. Wipe blades between cuts. The Best Marcotting Procedures For Bonsai always use clean steel.
FAQs Of Best Marcotting Procedures For Bonsai
How wide should the bark ring be?
Make it 1 to 2 times the branch diameter. Remove all green cambium to white wood.
Do I need rooting hormone?
It is not always needed, but it helps. IBA gel or powder boosts speed and success.
When is the best time to air-layer?
Late spring to early summer for most species. Warmth and active growth help.
How long until I can cut the layer off?
Wait for many roots that circle the moss. Most trees take 4 to 12 weeks or more.
Should I remove the sphagnum when potting?
If roots are thin, keep the moss block intact. Remove some at the next repot.
Final Verdict: Which Should You Buy?
For a complete start, the PEEORNT 22-Piece Bonsai Tools Kit is the top value. For clean spaces and lots of wire, the 20-Piece Bonsai & Succulent Tool Kit wins. The Fiskars Micro-Tip Snips are the precision upgrade I trust for thin bark.
For cut hygiene, Kiyonal Sealer is a smart add. On a tight budget, the 9-Piece Basic Set still gets you going. Any of these can help you follow the Best Marcotting Procedures For Bonsai with less stress and better roots.