Bonsai Nebari: How to Develop Strong Surface Roots

This post contains affiliate links. As an Amazon Associate, OurBonsai earns from qualifying purchases at no extra cost to you. Read our disclosure.
In this guide
Bonsai nebari is the Japanese term for the visible surface roots that spread out from the base of the trunk. Good nebari is one of the most important features of a quality bonsai. It makes the tree look old, stable and firmly rooted in the earth, like a great tree in a forest or on a windswept hillside. A trunk that goes straight into the soil like a stick, by contrast, looks young and unconvincing, no matter how good the branches are.
This guide explains what good nebari looks like, which trees develop it most easily, and six proven techniques to build it.
What makes good nebari?
| Good nebari | Weak nebari |
|---|---|
| Roots spread in all directions (radial) | Roots only on one or two sides |
| Roots taper gradually away from the trunk | Thick roots that stop abruptly |
| Roots of similar size, evenly spaced | One huge root dominating |
| Roots lie on or just under the surface | Roots dive straight down |
| No crossing or circling roots | Roots crossing over each other |
| Flare widens the trunk base naturally | Trunk enters soil like a pole |
Different styles favor different nebari. Formal upright trees often show an even radial spread. Windswept trees may show stronger roots on one side to “brace” against the wind. Our guide to types of bonsai shows how styles differ.
Which trees develop good nebari?
- Excellent: Trident maple, Japanese maple, ficus, Chinese elm, zelkova, beech and hornbeam. These respond well to root work and can even fuse roots into a solid plate.
- Good with patience: Junipers and pines, which need gentler root work spread over more years.
- Easiest to fix early: Young trees and cuttings, where root direction can be set from the start.
Trident maple is particularly famous for its nebari, which can fuse into a thick root plate over time.
How to develop bonsai nebari
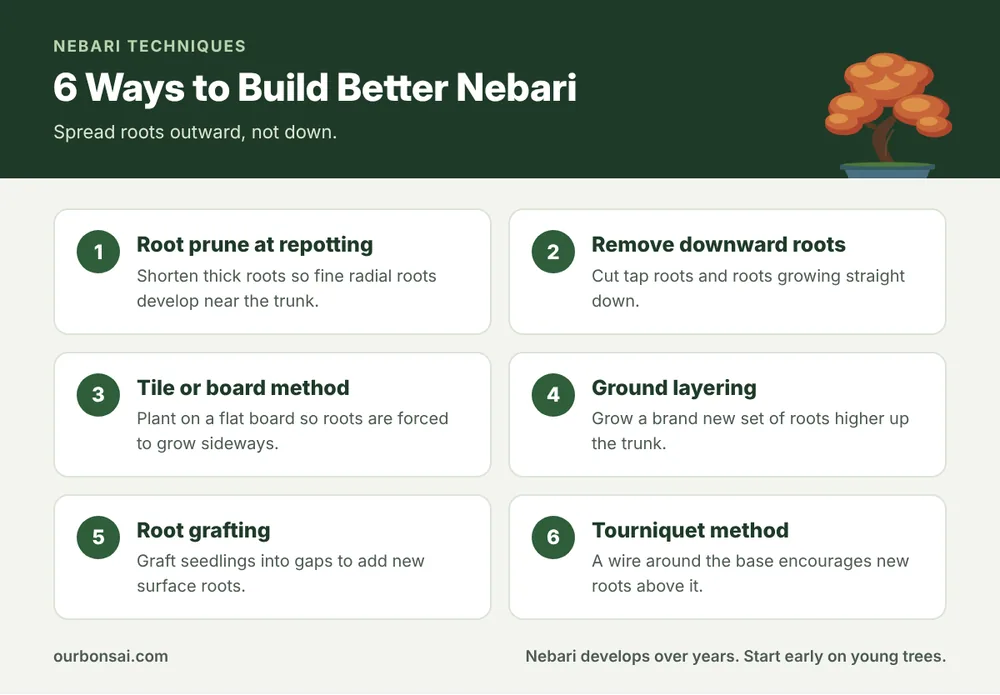
1. Root pruning at every repotting
Each time you repot, comb out the roots and look at the base from above. Shorten thick roots so that finer roots develop closer to the trunk. Remove roots that cross or circle. Over several repottings, this builds a dense, even spread. Our guide to bonsai repotting tools covers root hooks and scissors for this job.
2. Remove downward and tap roots
Roots that grow straight down add nothing to nebari and make the tree sit high in a shallow pot. Cut them back to the point where a lateral root branches off. On young trees, cutting the tap root early encourages lateral roots near the surface.
3. The tile or board method
Plant a young tree on a flat tile, plank or disc with a screw through the center of the root ball. The barrier stops roots growing down and forces them to spread sideways. After a few years of growth, the tree develops a flat, radial root base. It works especially well for maples and ficus grown from cuttings.
4. Ground layering
If a tree has poor nebari, you can grow a completely new set of roots higher up the trunk. Remove a ring of bark just above the soil, apply rooting hormone, and cover with soil or sphagnum moss. New roots form at the cut edge, often radially. When they are strong, the old roots below are removed. This is a form of air layering at ground level; our guide to marcotting procedures for bonsai explains the method in detail.
5. Root grafting
To fill a gap in the nebari, you can graft a young seedling of the same species into the trunk base so its roots become part of the tree. Approach grafting is the most common technique. It takes a few years for the graft to take and the root to thicken.
6. The tourniquet method
Wrap a tight piece of bonsai wire around the trunk just above the existing roots. As the trunk thickens, the wire constricts the sap flow, and the tree responds by producing new roots just above it. Later, the old roots below the wire can be removed.
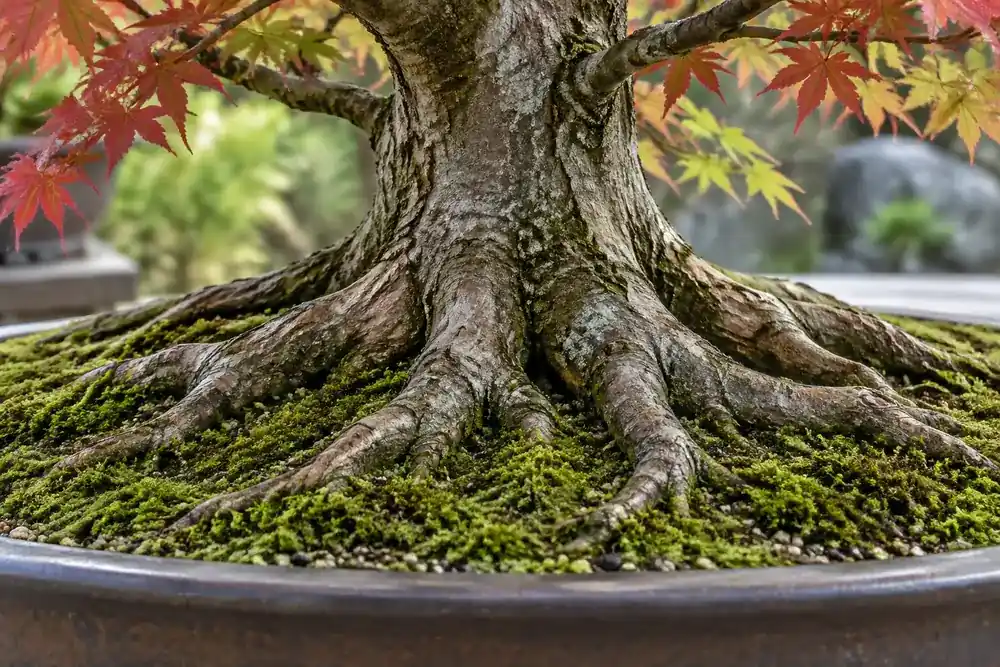
Showing off nebari
Developing roots is only half the job. You also need to display them:
- Plant the tree slightly higher in the pot at repotting, so the root flare sits at or just above the soil surface.
- Gradually expose roots by removing a little soil from the surface each year.
- Use a shallow pot that suits the tree and lets the base be seen. Our guide to the best ceramic bonsai pots with drainage covers shapes and depths.
- Keep moss tidy around the base; it should frame the roots, not bury them.
Exposed roots can dry out, so do this gradually and keep the soil surface evenly moist.
Nebari timing: when to do root work
Most nebari work happens at repotting time:
- Deciduous trees: early spring as buds swell.
- Tropical trees: late spring to summer when warm.
- Conifers: spring, with lighter root work.
Ground layering and grafting are usually started in spring when the tree is growing strongly. Work only on healthy trees, and do not combine heavy root work with other major jobs in the same season.
Common nebari mistakes
- Burying the root flare too deep at repotting.
- Leaving one dominant root that unbalances the base.
- Cutting too many roots at once on a weak tree.
- Ignoring crossing and circling roots until they thicken.
- Exposing roots too suddenly, so they dry out and die.
Nebari in different bonsai styles
Not every tree needs the same root spread. In formal and informal upright styles, an even, radial nebari looks most natural. In windswept and slanting trees, stronger roots on the side opposite the lean make the tree look braced against the wind. Cascade and semi-cascade trees, which grow over the edge of a pot, often show less nebari because the eye follows the trunk downward. Forest plantings rely more on the arrangement of trunks than on individual roots. When you plan your nebari, think about the style you want, so the roots support the story the tree tells. The Wikipedia article on bonsai shows examples of classic styles.
Caring for exposed surface roots
Once roots are exposed, they behave more like trunk than root. Over time, their surface turns to bark and they thicken in a way that adds to the tree’s age. In the meantime:
- Keep them moist while they adapt. A thin layer of moss or fine soil over newly exposed roots helps.
- Protect them from frost in winter; exposed roots on the surface are more vulnerable than buried ones.
- Avoid damage when working the soil or removing weeds around the base.
- Feed well so roots and trunk thicken together.
FAQ: bonsai nebari
What does nebari mean?
Nebari is Japanese for the visible surface roots at the base of a bonsai trunk.
How long does it take to develop good nebari?
Several years. Simple root pruning improves it every repotting, while ground layering and grafting can make big changes in two to four years.
Can I improve nebari on an old tree?
Yes. Gradual root pruning, ground layering and root grafting all work on established trees, especially deciduous species.
Do junipers have good nebari?
They can, but they develop it slowly and need gentler root work than maples or ficus.
Final thoughts
Bonsai nebari turns a tree in a pot into a convincing miniature of an old tree. Prune roots so they spread outward, remove those growing down, and use methods such as the tile technique, ground layering or grafting to fill gaps. Then display your roots by planting at the right height and exposing them gradually. Start early, be patient, and your tree’s base will look more powerful with every repotting. For more trident maple ideas, see our Brussel’s trident maple bonsai review, and you can find a bonsai root hook on Amazon for the job.