Guy Wire Bonsai Technique: Lower Branches the Easy Way


This post contains affiliate links. As an Amazon Associate, OurBonsai earns from qualifying purchases at no extra cost to you. Read our disclosure.
In this guide
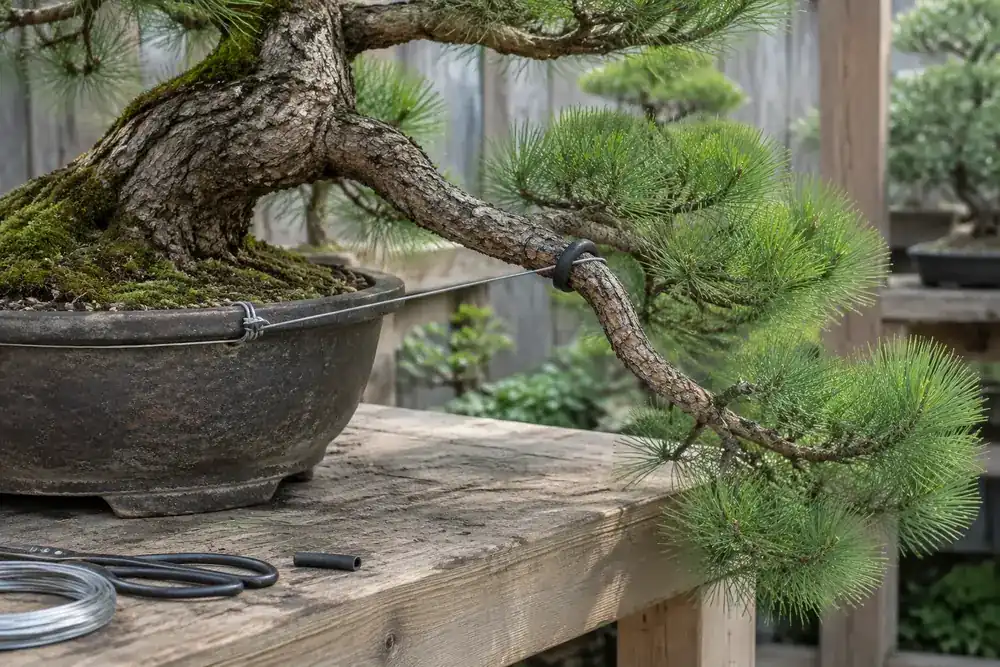
The guy wire bonsai technique is one of the simplest ways to change the angle of a branch. Instead of wrapping wire around the branch in coils, you attach a single wire from the branch to an anchor point below, then tighten it to pull the branch down. Guy wires are ideal for thick, stiff branches that are hard to coil-wire, for lowering branches on conifers to give an aged look, and for making small adjustments without covering the tree in wire.
This guide explains how guy wires work, where to anchor them, how to protect the bark, and when to remove them.
Why use a guy wire?
- Thick branches. Coil-wiring a branch thicker than a finger needs very heavy wire. A guy wire can move it with much thinner wire.
- Gradual bends. You can tighten a guy wire a little every few weeks, letting the branch adapt slowly.
- Clean look. Fewer coils on the tree, which is useful before a show or photo.
- Combined with coil wiring. Coil wire shapes the branch, and a guy wire sets its overall angle.
- Less bark damage. There are no coils to bite in along the branch.
Lowering branches is one of the most common styling moves, especially on junipers and pines, because old trees in nature have branches weighed down by age and snow. Our guide to juniper bonsai styles for beginners shows where lowered branches fit in a design.
What you need
- Aluminum or copper wire, usually 1.5 to 3 mm depending on the branch.
- Rubber tubing, a cut piece of garden hose, or folded leather to protect the bark.
- Pliers to twist and tighten.
- Optional: a small turnbuckle for fine tension control on large trees.
Our guide to bonsai wire sizes and uses helps you choose the gauge. Many tool kits include pliers suitable for tightening; see our guide to the best Japanese bonsai tool kit.
Where to anchor a guy wire
| Anchor point | Pros | Cons |
|---|---|---|
| Pot tie-down holes or drainage holes | Very secure | Wire runs under the pot |
| Wire around the pot | Easy, no holes needed | Can slip on glazed pots |
| A thick surface root | Natural, close to the trunk | Needs protection to avoid scarring |
| The trunk below the branch | Good for upper branches | Must be well padded |
| Another, stronger branch | Useful high in the tree | Can pull that branch too |
| A wire wrapped around the trunk base | Flexible position | Needs checking for bite |
Always choose an anchor that is stronger than the branch you are pulling.
How to guy wire a bonsai branch
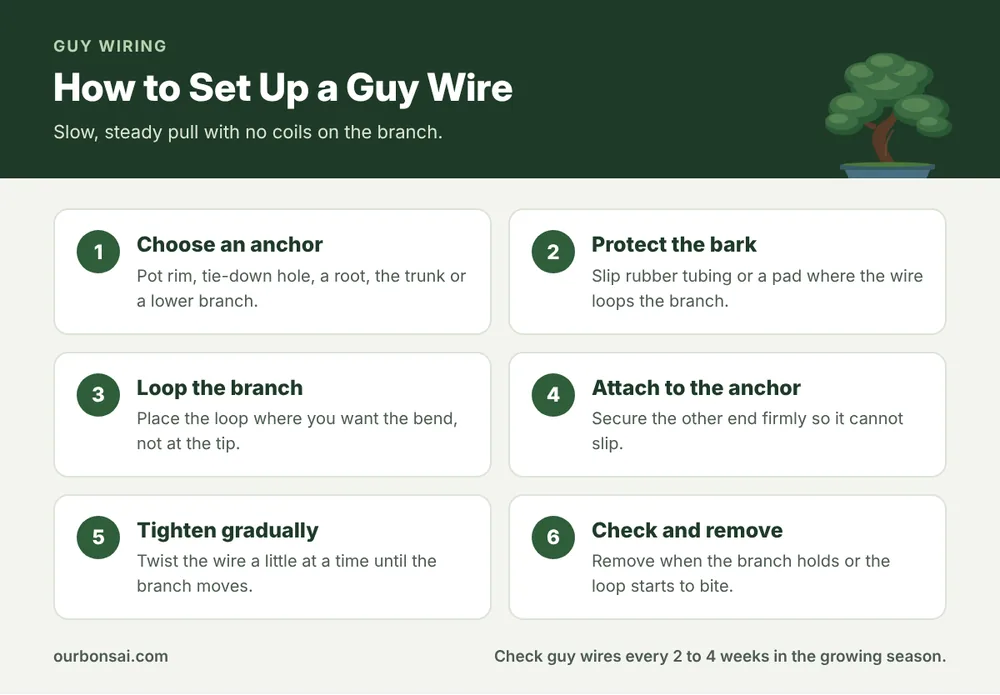
Step 1: Decide where the bend should happen
Look at the branch and decide where you want it to bend. The guy wire should loop around the branch near that point. If you loop it near the tip, the branch will arch instead of bending at the base.
Step 2: Protect the bark
Slide a short piece of rubber tubing over the wire where it will loop around the branch, or place a pad under it. This spreads the pressure and stops the wire cutting into the bark.
Step 3: Loop the branch
Wrap the protected part of the wire once around the branch and twist it to form a loose loop. Do not make it tight around the branch; the pull comes from tightening the guy line, not the loop.
Step 4: Attach to the anchor
Run the other end down to your anchor point and secure it firmly.
Step 5: Tighten gradually
Twist the wire with pliers, a little at a time, so the branch moves down slowly. Watch the branch junction, where it meets the trunk; this is where cracks happen. Stop at the first sign of stress. You can tighten again in a few weeks.
How long should guy wires stay on?
It depends on the branch and the season:
- Young, flexible branches: a few months in the growing season.
- Thick branches on conifers: often six months to a year or more.
- Deciduous trees: usually one growing season.
Check every two to four weeks in the growing season. Remove the guy wire once the branch holds its new angle when you loosen the wire, or sooner if the loop starts to press into the bark. If the branch springs back, reapply it.
Combining guy wires with coil wiring
On many trees, the best result comes from both:
- Coil-wire the branch to shape its secondary branches and give it movement.
- Add a guy wire to set the angle of the whole branch from the trunk.
This lets you use thinner coil wire, because the guy wire does the heavy lifting.
Common guy wire mistakes
- No protection under the loop, leading to deep bark scars.
- Anchoring to something weaker than the branch.
- Tightening too fast, cracking the branch at the trunk.
- Looping near the tip, giving an unnatural arch.
- Forgetting the guy wire until it has bitten deep into the bark.
- Running the wire across foliage or other branches, which get crushed.
Guy wires on different species
- Junipers and pines: The classic use. Lowered branches give a mature, windswept look. They hold well once set.
- Maples and elms: Work well on young branches; older branches are stiffer. Protect the smooth bark carefully.
- Brittle trees such as azaleas: Use very gentle tension and tighten in small steps.
You can find rubber tubing for plant ties on Amazon, or use an old piece of garden hose cut to length.
Using a turnbuckle for fine control
On larger trees, or when you need to move a thick branch over several months, a small metal turnbuckle makes life easier. Fit it in the middle of the guy line. Turning its center a little at a time increases the tension evenly without twisting the wire itself, so you can make tiny adjustments every couple of weeks. Turnbuckles are also easy to loosen if you see the branch starting to stress at its base. They are especially useful on big juniper and pine branches that need a long, slow bend.
FAQ: guy wire bonsai
Is a guy wire better than coil wiring?
They do different jobs. Guy wires are best for changing the angle of thick or stiff branches. Coil wiring is better for shaping curves along a branch.
Can a guy wire damage my bonsai?
Only if it is too tight, unprotected, or left on too long. Use tubing and check regularly.
What can I anchor a guy wire to if my pot has no extra holes?
Run a loop of wire under the pot, around a strong root, or around the trunk base with padding.
When is the best time to use guy wires?
Late autumn to early spring for conifers, late winter to spring for deciduous trees. The Wikipedia article on bonsai cultivation and care describes guy wires among the standard shaping methods.
Final thoughts
The guy wire bonsai technique is a quick, low-stress way to lower and position branches, especially thick ones. Pick a strong anchor, protect the bark with tubing, loop the branch where you want it to bend, tighten slowly and check often. Combined with coil wiring, it gives you precise control over your tree’s shape. For a well-designed starter juniper to practice on, see our Japanese juniper bonsai tree care guide.