How to Tie Bonsai Into Pot Securely (Step-by-Step Guide)

This post contains affiliate links. As an Amazon Associate, OurBonsai earns from qualifying purchases at no extra cost to you. Read our disclosure.
In this guide
- Why tie a bonsai into its pot?
- What you need
- How to tie bonsai into pot step by step
- Tying in different pot types
- How tight should tie-in wire be?
- When to remove tie-in wires
- Tying in after slip potting or autumn repotting
- Alternatives when wire is not ideal
- Common tie-in mistakes
- Choosing the right wire thickness
- FAQ: tie bonsai into pot
- Final thoughts
Learning how to tie bonsai into pot properly is one of the small skills that makes a big difference after repotting. A freshly repotted tree has a reduced root ball sitting in loose new soil. Every time the wind moves the canopy or you touch the tree, it can rock slightly in the pot. Each tiny movement tears the delicate new root tips that are trying to grow into the fresh soil. Tying the tree in firmly stops that movement and lets roots establish quickly.
This guide explains why tying in matters, what wire to use, and how to do it step by step in pots with different hole layouts.
Why tie a bonsai into its pot?
- Protects new roots. Root tips are fragile. A stable root ball means they can grow undisturbed.
- Stops the tree tipping over in wind, especially top-heavy or cascade trees in shallow pots.
- Keeps the planting angle you chose when styling the tree.
- Prevents the tree from shifting when you water or work on the branches.
A tree that is not tied in often sits still for weeks after repotting because its new roots keep breaking. Our guide to bonsai repotting wire explains more about the wire itself.
What you need
- Aluminum wire, usually 1.5 to 2.5 mm thick. Use 3 mm or more for large, heavy trees. Copper also works but is harder to work with. You can find aluminum bonsai wire on Amazon in rolls.
- Drainage mesh to cover the holes.
- Wire cutters and pliers to twist and tighten.
- A chopstick for working soil in.
Our guide to the best bonsai repotting tools covers a full kit.
How to tie bonsai into pot step by step
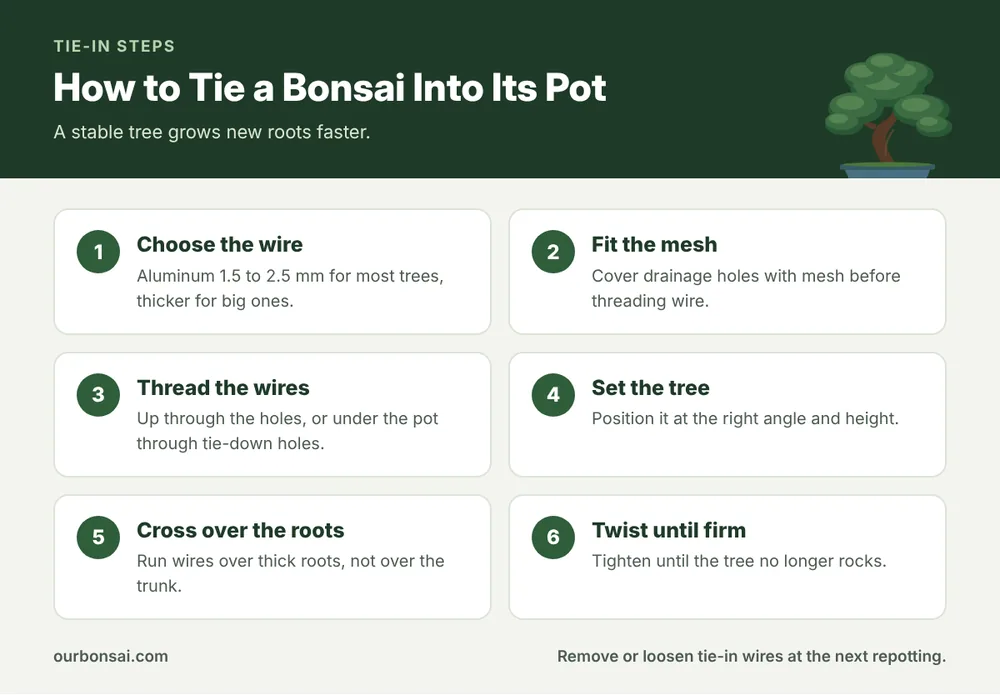
Step 1: Prepare the mesh
Cut squares of mesh slightly larger than each drainage hole. Fix them with a small wire staple: bend a short piece of wire into a U, push the ends through the mesh and hole from inside, and bend them flat underneath.
Step 2: Thread the tie-in wires
The simplest method for pots with two drainage holes:
- Cut a piece of wire long enough to go up through one hole, over the root ball and down to the other side with plenty of extra.
- Pass the wire up through the drainage hole (or through dedicated small tie-down holes if your pot has them), so both ends stick up into the pot.
- Repeat for the second hole.
For pots with only one central hole, thread a short piece of wire or a small stick under the pot across the hole, then run the wire ends up through it.
Step 3: Add the drainage layer and soil mound
Add a thin layer of coarse soil, then a small mound of normal soil where the tree will sit. Keep the wire ends pulled out to the sides so they do not get buried.
Step 4: Position the tree
Set the tree on the mound at the angle and height you want. The root flare should sit at or just above the rim level.
Step 5: Bring the wires over the roots
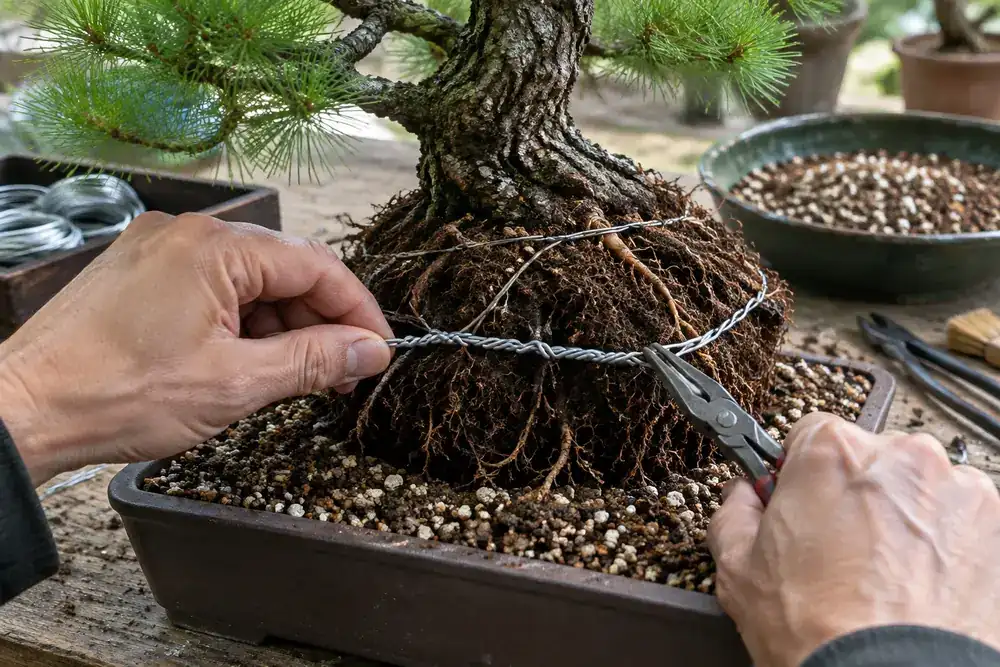
Bring the wires up and over the root ball, crossing over thick roots near the edge of the root ball. Avoid running wire over the base of the trunk or over very fine roots. If needed, use a short piece of rubber tube or a small stick under the wire to protect thick surface roots.
Step 6: Twist until firm
Twist pairs of wire ends together with pliers, tightening a little at a time and alternating sides so the pull is even. Stop when the tree does not rock when you gently push the trunk. Then cut off the excess and tuck the twisted ends down into the soil.
Step 7: Fill with soil and water
Add the rest of the soil, work it in with a chopstick and water thoroughly.
Tying in different pot types
| Pot type | Method |
|---|---|
| Two or more drainage holes | Wires up through the holes or tie-down holes |
| One central hole | Bar or stick across the hole underneath, wires up through it |
| Training pots with many holes | Wires up through any two holes on opposite sides |
| Pots with built-in tie-down holes | Use these; they keep wire off the drainage mesh |
| Very shallow or slab plantings | Wire anchored to the slab with glued loops or anchors |
For more on pot types, see our guide to the best ceramic bonsai pots with drainage.
How tight should tie-in wire be?
Firm enough that the tree does not move, but not so tight that it cuts into thick roots or splits the root ball. If the wire digs visibly into a root, add a piece of rubber or plastic tubing under it. Check after the first heavy watering, as the soil may settle and the tree loosen a little.
When to remove tie-in wires
Tie-in wires can usually stay until the next repotting. By then, the roots have filled the pot and the tree is stable on its own. At repotting, cut the old wires under the pot before lifting the tree out. Remove all old wire pieces so they do not tangle with the new roots.
Tying in after slip potting or autumn repotting
Any time a tree is moved into a new pot, it needs tying in, even if the root ball was not disturbed. Trees repotted in autumn, as described in our guide to repotting bonsai in autumn, especially need firm tie-in to cope with winter winds.
Alternatives when wire is not ideal
- Garden twine or raffia for trees in temporary containers.
- Rubber-coated wire for delicate pots.
- A chopstick or bamboo stake pushed into the soil and tied to the trunk, for very young trees.
These are less secure than wire but can be useful in special cases.
Common tie-in mistakes
- Not tying the tree in at all.
- Running wire over the trunk base, which can scar it.
- Tightening so hard that the wire cuts into roots.
- Leaving the wire ends sticking up out of the soil.
- Forgetting to cut the old wires under the pot before the next repotting.
Choosing the right wire thickness
As a rough guide, use about 1.5 mm aluminum for small shohin trees, 2 to 2.5 mm for medium trees up to around 40 cm tall, and 3 to 4 mm for large, heavy trees or big root balls. If the wire stretches or straightens when you twist it, it is too thin for the job. If it is very hard to bend with pliers, it is thicker than you need. For very heavy trees, many growers run two pairs of wires at right angles across the root ball instead of one, which spreads the pull and holds the tree more evenly.
FAQ: tie bonsai into pot
Do I have to tie my bonsai into its pot?
It is strongly recommended after every repotting. Untied trees rock in the wind and damage new roots.
What wire should I use to tie a bonsai in?
Aluminum wire about 1.5 to 2.5 mm thick for most trees. Use thicker wire for large trees.
Can I use copper wire to tie in a bonsai?
Yes, but it is stiffer and harder to twist neatly. Aluminum is easier for beginners.
When should I remove the tie-in wires?
At the next repotting, when the roots have filled the pot. The Wikipedia article on bonsai cultivation and care describes tie-in wiring as a standard part of repotting.
Final thoughts
Once you know how to tie bonsai into pot, it takes only a couple of minutes at each repotting, and it pays off in faster, stronger root growth. Fit mesh over the holes, thread aluminum wire up through them, bring it over the root ball, protect thick roots and twist until the tree no longer moves. For a smoother repotting session, a bonsai repotting mat keeps soil and wire offcuts in one place.