How to Wire Bonsai Branches: Positioning and Pad Building


This post contains affiliate links. As an Amazon Associate, OurBonsai earns from qualifying purchases at no extra cost to you. Read our disclosure.
In this guide
Once you understand the basics of wiring, the real art is learning how to wire bonsai branches so the whole tree looks natural and mature. Wiring a single branch is a technique; wiring all of them into a convincing design is styling. It is about setting the angle where each branch leaves the trunk, giving it subtle movement, spreading the side branches into flat pads and lifting the tips toward the light.
This guide focuses on branch-by-branch wiring: the order to work in, how to wire pairs of branches, how to position primaries and secondaries, and how to build foliage pads.
Before you start
- Know your front and design. Decide which side is the front and which branches stay. Remove unwanted branches first.
- Choose the right season. Late winter to early spring for deciduous trees, late autumn to winter for conifers, almost any time for tropical trees.
- Have several wire sizes ready. You will need thicker wire for primaries and thinner wire for secondaries and tips. Our guide to bonsai wire sizes and uses explains gauges.
- Water the day before so branches are flexible.
You can buy assorted bonsai training wire on Amazon in multi-size packs.
The wiring sequence
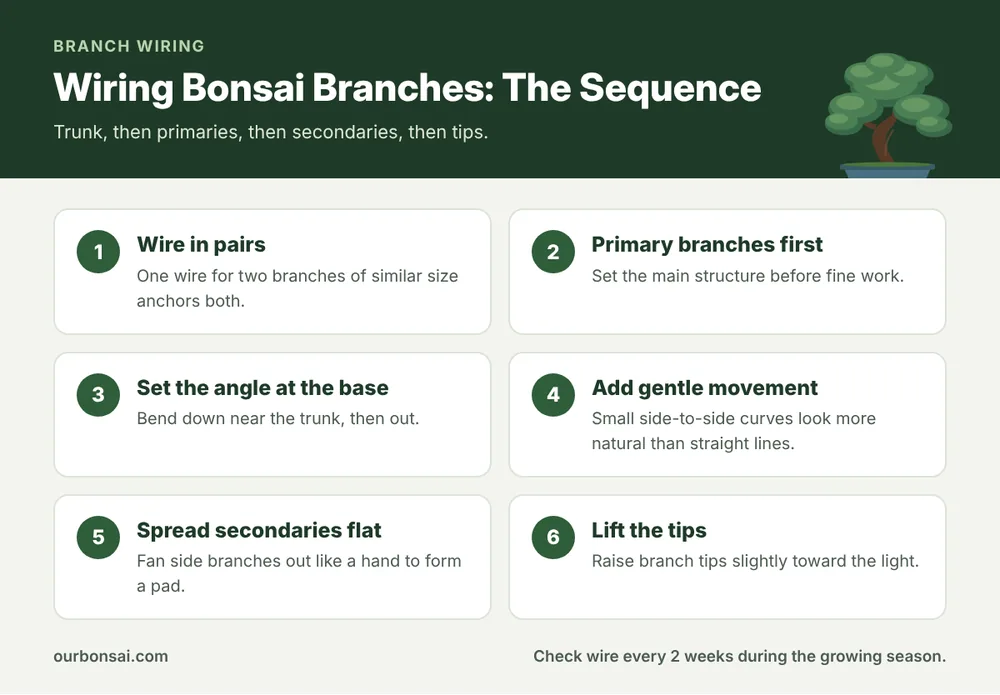
Work from the bottom of the tree to the top, and from thick to thin:
- Trunk (if needed).
- Primary branches, the ones coming directly off the trunk.
- Secondary branches, coming off the primaries.
- Tertiary branches and tips.
This order matters, because each layer of wire is anchored by the one before it.
How to wire bonsai branches step by step
Wire branches in pairs
The best way to anchor wire is to wrap one piece around two branches of similar thickness. Start at the trunk between them, wrap once or twice around the trunk, then run one end out along each branch. Each branch anchors the other. Choose pairs that are close together and similar in size. If there is no partner, anchor the wire by wrapping it twice around the trunk.
Set the angle at the base
Most branches on old trees leave the trunk at a slight downward angle, weighed down by age. Bend the branch downward close to the trunk, then level it out further along. This “down then out” shape gives instant maturity. Support the junction with your thumb while bending, since this is where branches crack. For very thick branches, see the guy wire method or our tips on bending heavy wood.
Add movement
Real branches rarely grow in a straight line. Add gentle side-to-side curves, viewed from above, and small up-and-down undulations. Avoid S-curves that are all the same size; vary them like a real branch.
Spread the secondary branches
Wire the side branches coming off each primary and fan them out horizontally, like the fingers of an open hand. This creates a flat, layered pad of foliage. Remove side branches that point straight up or straight down.
Lift the tips
At the end of each branch, lift the tip very slightly upward. This mimics how branches grow toward light and keeps the tips vigorous.
Building foliage pads
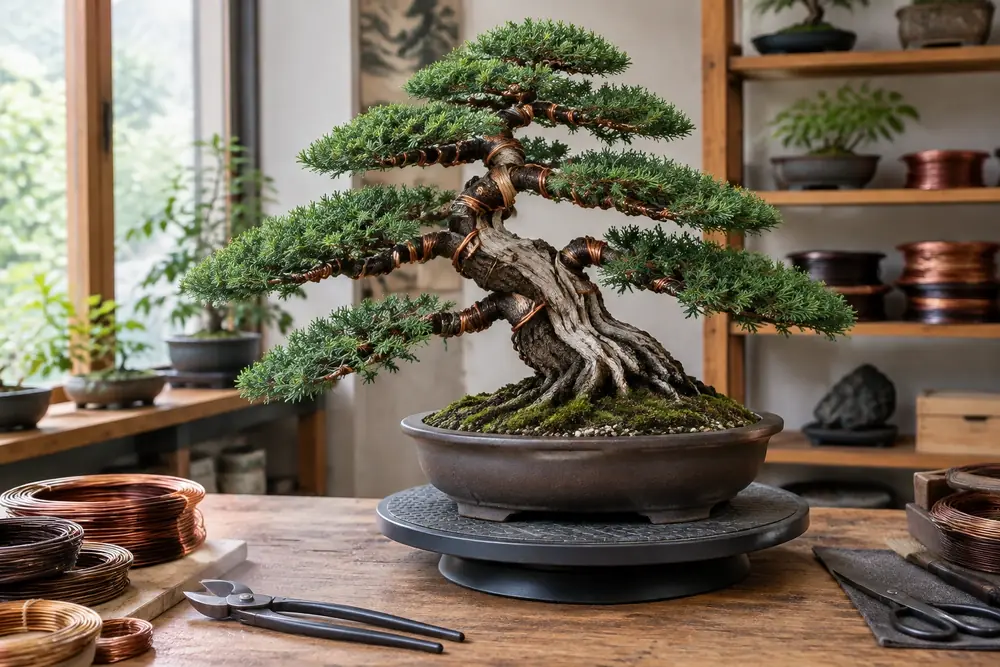
A foliage pad is a cloud-like layer of leaves or needles on top of a branch. Good pads:
- Are wider than they are tall.
- Have a slightly domed top and a clean underside.
- Leave gaps between pads so light reaches inside the tree and you can see the branch structure.
On junipers and pines, pads are built by wiring each small shoot into a flat fan, then thinning out growth underneath. Our guide to juniper bonsai styles for beginners shows typical pad layouts. On deciduous trees, pads are built more by pruning and bud selection; wiring sets the main structure.
Branch placement tips
| Rule of thumb | Why |
|---|---|
| First branch about one third up the trunk | Shows off the base and trunk |
| Branches alternate left, right and back | Creates depth and balance |
| No branches directly opposite each other | Avoids “bar branches” |
| Branches get shorter and thinner toward the top | Gives a natural triangular outline |
| A back branch for depth | Makes the tree look three-dimensional |
| Avoid branches pointing straight at the viewer low down | Hides the trunk |
These are guidelines from classic bonsai design, explained in more detail in our guide to types of bonsai.
Wiring different trees
- Junipers: Flexible and forgiving; ideal for practice. Wire every shoot to build dense pads.
- Pines: Wire after removing old needles so you can see the shoots. Avoid trapping needles.
- Maples and elms: Wire in late winter before buds open. Smooth bark marks easily, so check often. See our guide to Japanese maple bonsai.
- Jade and succulents: Branches are soft and can be brittle; use thin wire and gentle bends, or shape by pruning. Our guide to traditional jade bonsai styles shows typical shapes.
How to apply the wire neatly
Neat wiring is not just about looks. Even coils hold better and are easier to remove. Hold the branch and wire together with one hand and wind with the other, keeping each coil at roughly a 45 degree angle to the branch. Steeper coils do not hold the bend, and flatter coils slip. Keep the wire touching the bark along its whole length, but never so tight that it presses in. When two wires run along the same branch, lay them side by side rather than crossing. Finish each wire just past the last leaf or bud, and tuck the end down so it does not snag.
On the outside of every bend, the wire should sit where it will support the curve. If you plan to bend a branch downward, the wire must cross over the top of the bend, not underneath it. Think about the direction of each bend before you start winding, and it will hold far better.
Common branch-wiring mistakes
- Wiring randomly without a plan for the overall design.
- Running two wires across each other.
- Coils too close or too far apart.
- Trapping leaves or needles under the wire.
- Bending only at the tip instead of at the base.
- Leaving wire on too long so it bites into the bark.
Aftercare after wiring
Keep a freshly wired tree out of strong sun and wind for a week or two, especially after strong bends. Do not combine heavy wiring with repotting on a weak tree. Check the wire every two weeks in the growing season, and remove it, by cutting at every coil, before it bites. Our guide to the best Japanese bonsai tool kit covers the cutters and pliers that make this easier.
FAQ: wire bonsai branches
Which branches should I wire first?
Start with the lowest primary branches, then work upward. Within each branch, wire thick parts before thin ones.
Can I wire all branches at once?
On a healthy juniper or pine, a full styling is common. On weaker or deciduous trees, spreading the work over two sessions is gentler.
How much should I bend a branch?
Enough to set a clear downward angle and movement. Bend slowly, and stop at the first sign of cracking.
How do I make branches look old?
Lower them at the base, add gentle movement and build flat pads. The Wikipedia article on bonsai cultivation and care explains how wiring is used to imitate the shapes of mature trees.
Final thoughts
To wire bonsai branches well, follow a sequence: plan the design, wire in pairs from bottom to top, set each branch angle low at the trunk, add natural movement, fan the secondaries into flat pads and lift the tips. Check the wire often and remove it in time. With each styling session, your tree will look more like a miniature of an old tree in nature.